
Quick Setup Activate
Quick Setup Activate is a company that provides technical support help regarding McAfee Antivirus Software, Norton Antivirus Software, and Office Setup.
How to set up a Proxy Server in Windows 10
A proxy server is advantageous as they act as the mediator among the PC and internet. They can create an online request and give back the request details. Although they come in quite handy, you may still not know how to make one. If you need to make the proxy server, then it is not as hard as it seems. This post will teach you how to do it, so keep on reading and follow the instructions.
Proxy Servers 101
It is the kind of substitute server or the mediator. It provides the PC with different IPs. It means that proxy servers insert extra privacy to the online presence and store a good amount of bandwidth. While using the proxy, documents and internet traffic are entirely compressed, and the entire not needed part is kept aside. Proxies are very helpful for companies with a huge amount of workers with the same browsing style. It works quickly as they improve the cached site version without installing any not needed documents. It is divided into 2 types, public and private. Though it is quicker as only a few people use it. And that’s why it is safe. When talking about privacy and security, in comparison to VPN service, the proxy server is quite less effective.
Uses of Proxy Servers
Proxy servers are customized by employers, schools, and places where a large amount of people is connected to a similar network. Proxies provide owners the better sight of the network and manage everything that’s working. To utilize the internet in school like you need to connect to the proxy network of the school. It is the cause that network administrators block lots of sites with ease.
How to Make the Proxy Server on Windows
If you need to make the proxy server on Windows, then you can follow the provided steps:
- Open the Settings on the PC.
- Tap on Network and Internet button.
- Select the Proxy settings button.
- Allow Use Setup Script button.
- Insert script address that users have.
- Hit the Save button. You can then close the settings, and the script must become operative instantly.
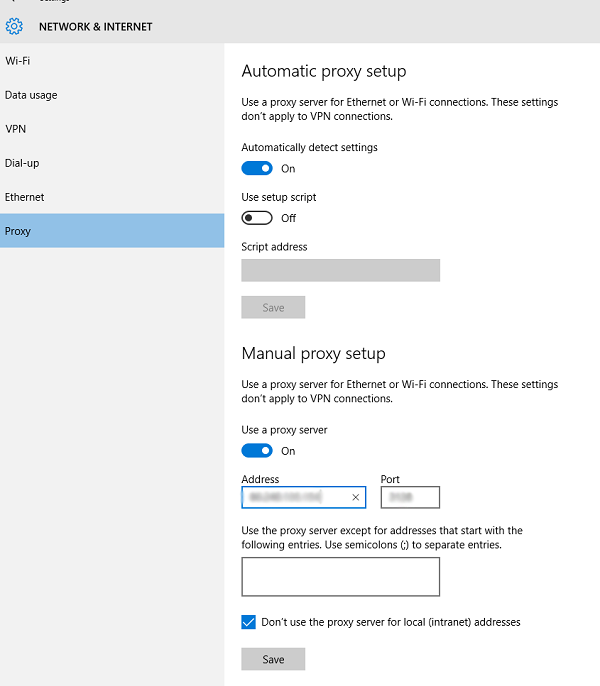
Another method to create the proxy server manually. If you wish to create the proxy server manually, then pursue the given instructions:
- Launch the Windows Settings.
- Click on Network and Internet.
- Tap on Proxy.
- Allow the use of the Proxy server below the Manual Proxy customizing button.
- Type IP below Address button and port figure in their respective box.
- As you finish it, click on Save to apply the changes.
- Close the menu.
How to Make the Proxy Server on Mac
If you want to make the proxy server on Mac, then abide by the given steps:
- Start the System Preferences section.
- Tap on Network.
- Locate Advanced and then click on it.
- Choose the Proxy button. Then you may customize proxy automatically if you select Auto Proxy Discovery, and then PC is going to configure everything automatically.
- Or else you can perform that manually. Then you need to tap on the kind of proxy, insert its port, and then located in the respective box. You may also have to insert the proxy server details if the server is confined with a password.
- As you have completed, tap on OK to apply the changes and make proxy.
You will then identify different kinds of proxy servers. HTTP is a famous one, but it is not secure; however, HTTPS is quite a more secure version of the HTTP. SOCKS have a lot of uses like it is amazing for torrents, but it is slower than other kinds of proxies.
Proxy Servers Are Sufficient
It is handy according to the requirements. If your major concern is online security privacy, then you must use the VPN service as it is a good option. Proxies still have several uses as workplaces and schools cannot work without them.
Source:https://justnorton.com/how-to-setup-a-proxy-server-in-windows-10/

DiskCryptor is a Powerful Disk Encryption Software for Windows 10
Windows 10 provides built-in encryption solutions like BitLocker to ensure if the drive is used somewhere else, then it is not going to be readable. Though like other resolutions, it is the unshared resolution. If users are finding a substitute for BitLocker as an open-source encryption solution, then you can try the DiskCryptor. You may apply it to encrypt the disk partition with the system partition. If you need to use the DiskCryptor, then this post might be useful for you. Keep on reading to follow the instructions. DiskCryptor Disk Encryption Software As you begin, DiskCryptor is not the latest. According to a recent developer, it was created as a substitute for the DriveCrypt Plus Pack or PGP WDE by the NTLDR. Though there were no development from 2014, so people on diskcryptor.org takes place development of the software seems active at the GitHub page so that you can use it if you were looking for the alternate. DiskCryptor Features Encryption of the disk partition. Complete the support for the vibrant disks. It works with RAID size, which is supported by the system, such as supports disk, including large sector size. Support for the key documents. It works with the DVD, CD, USB storage, apart from the storage devices. Launch license GNU GPLv3. Support for hotkeys also optional command-line interface. As the Encryption is finished, partition or the size will not be applied to discover the data. It is going to protect with the password, and as you type the password, the structure of partition will be available. How to Use the DiskCryptor If you wish to use DiskCryptor, then pursue the given instructions: As you open the software, it will then the entire partition organized by physical drive. Click on any partition and then right-click. Tap on Encrypt. Then you have to choose an encryption algorithm and then wipe mode. Set the password or apply Keyfile. Begin Encryption then wait till it finishes. Password will be changed. Right-click on the size and select to change the password option from the context section. The total time used for the Encryption is going to based on the speed and size of the drive. If users encrypt initial partition, You will require to insert a password while the boot procedure. The two exciting features that you must have an idea about. DiskCryptor Wipe Mode As you use the Wipe mode while Encryption, it will not remove the documents nor any remaining data that the document system includes. According to developers, it is not important because the program encrypts the entire document system. It rather avoids chances of retrieving the information by inspecting residual magnetic energy, which can complete on the specialist equipment. Resume, Pause Encryption Anywhere This function enables users to pause ongoing encryption procedure and resume it again later. If you utilize it, then you may also decrypt unfinished Encryption. It is easy to use if you have selected the wrong drive for the Encryption, and users don’t need to wait for hours to finish it. Moreover, if you are trying to encrypt the external drive, you may pause it and switch the PC and then begin Encryption on the other PC. As you must perform the entire types of Disk Management following the encrypting system, developers will suggest against it. It is because software may not have tested on these situations. You may download it. After finish installing, you need to start the PC again before you may use the software. If you decided to remove it, then ensure to decrypt the entire size, particularly system partition.
Source: https://haroffice.com/diskcryptor-is-a-powerful-disk-encryption-software-for-windows-10/

How to Boot From USB in Windows 10
Previously, users mostly boot the PC from CDs and Floppy disks but those days are now over. Today if you want to troubleshoot the computer, boot it from the other version of the operating system or install the Windows upgrade, it is done quickly by booting from a USB drive. Windows 10 has also made it easy to boot from USB. All you require is the USB drive that has the bootable version of Windows. If you need to boot from USB in Windows 10, then this post might be useful for you. Read through the blog to follow the instructions to get the idea of it.

Each time you boot Computer, default boot place is commonly hard-driven wherever the operating system has been installed. Though there are several times when you need to boot Computer from a USB drive, however, it is not something which is popular, but if the users may have an idea to do it, but they must not know the entire process.
How to Boot From USB in Windows 10
Boot From the USB Within Windows 10
If you need to boot from USB within Windows 10, then abide by the given steps:
- Connect the USB drive in any of the Computer’s port.
- Boot the Advanced Startup.
- Click on Use a device.
- Choose USB drive that you need to boot from.
- The Computer is going to start again then boot from that drive.
Boot From the USB Drive in Windows 10 Computer
In case you need to boot from the USB drive in Windows 10 Computer, then you need to follow the offered steps:
- Connect the USB drive in any of the Computer’s port.
- Insert the Boot Menu while the PC boots.
- This procedure may vary from Computer to Computer, so check the Computer manufacturer requirements depending on the needs.
- Click on the USB drive that you need to boot from in the Boot Menu.
- This procedure is based on the Computer that you run
- You may either shift USB drive up important list via F4 and F5 keys.
- You may also click to boot from the menu.
Boot From the USB Drive on Surface Device
If you want to boot from the USB drive on a Surface device, then you can follow the provided steps:
- As the surface tool is switched off, connect to a USB device.
- Hold a sound up option.
- Tap and release the power option.
- Hold sound up option pressed till the Windows logo or Surface vanish.
- Boot UEFI must display.
- Choose Configure Alternate device Boot Order option.
- Organize orders so that a USB drive is the first pick.
- Stop the Secure Boot Control option.
- Start a Surface device again.
Following the procedure, you can boot both the Windows 10 Computer and the Surface device from a USB drive. Remind that this is not going to influence the ability of the device to boot usually. If it boots without bootable drive associated, it may then return to the booting from the system drive.
Chloe Decker is a self-professed security expert; she has been making the people aware of the security threats. Her passion is to write about Cyber security, cryptography, malware, social engineering, internet and new media. She writes for Microsoft products at office.com/setup.
Source: https://office-uk.com/blog/how-to-boot-from-usb-in-windows-10/

How to find iPhone and iPad Backup on Mac or PC?
iPad and iPhone play a prominent role in our high tech life. They serve us as an assistant to manage all the digital works, but if something went wrong with your device and you need to recover backup data, what would you do? The answer is iTunes backup that preserves all your previous data synced to your iTunes account. It can be accessed through any Window or Mac desktops from any location.

How to Fix “NTLDR Is Missing: Press Ctrl + Alt + Del to Restart” Error
“NTLDR” is the boot loader file that plays a vital role in boosting the device. It used to load the system’s OS when MBR calls it to load the bootable file. After loading the kernel of OS, the device executes to launch automatically. It runs on all the editions of OS and performs the task of file boot loading. In case the system is unable to find the NTLDR file, then the display flashes boot error as the “NTLDR is Missing” issue.

Samsung Galaxy S20: Specs, Leaks, Release Date, and News
We all know that Samsung always releases the S series of smartphones every year. They change some features and add some advanced features to make their smartphones attractive and also giving a new look. In the new S series phones, it can be designed with more cameras, and a well-designed display or more important has a favorable price.

How to Get an Apple Student Discount
Apple has an Apple’s Education store where students, lecturers, and teachers can buy Macbook and iPad at an affordable price. What is more that you can also get a 50% standard subscription on the music? In this blog, you can learn how you get the Apple student discount.
If you are a student or students’ parent, lecturer, or teacher then you can keep money on purchase Apple subscription on Macbook and iPad. Here you can learn how you get a discount on Macbook and iPad from the Apple education shop.
Apple knows that the devices are mostly used by youngsters and students, making them vital for the company. So Apple built a separate Apple’s Education store that offers discounts on Macbook and iPad.

How to Disable Launchpad on Mac
Launchpad for macOS was introduced to help users to run the application quickly. You may arrange the Mac Launchpad easily, shift application icons, gather them together or delete an application that you may not be required any longer. It instinctively and clearly displays any app that is installed on Mac. Also, it provides the ability to arrange the application in the proper order to access apps easily that you may be required. If users need to switch off Launchpad because of any basis or to stop unintentionally open it in MacOS, they may switch off the function fully.

How to Link a YouTube Video on Snapchat
Snapchat is a flexible, fun app that is best utilized for talking with friends. Moreover, it can be used for businesses as well as increasing social media brand. And that’s why several companies, influencers, and celebrities use Snapchat daily. The most important feature of Snapchat is to share videos and links. Though mostly Snapchat users do not use this feature even when it is available since 2017. Keep on reading to learn how to do it.

Disney CEO Bob Iger Steps Down as Bob Chapek Replaces Him
“Bob Chapek Replaces Bob Iger as Disney CEO”
Bob Iger steps down as CEO of Disney with immediate effect and now will continue to be the chairman of Disney. The news has been confirmed by Disney and it has also been revealed that Bob Chapek will be the next CEO as the chairman of Disney parks, products, and experiences. Further, it has also been revealed by Disney that Iger will assume the role of executive chairman and will focus on making creative strategies for the company during his remaining tenure. Meanwhile, It has been said that Chapek will be appointed to the board of directors later and till then continue to report to Iger.

How to Fix Telegram Not Connecting or Working on Android Devices?
Telegram is a secure, reliable messaging application than can conveniently work on various Android devices. It works on cloud-based features so that you can access your messages worldwide on several platforms. The messaging services are quite fast and hold strong encryption features. Telegram is ad-free and provides a quick messaging system for your android device.

How to Fix “DPC Watchdog Violation” Error on Windows 10?
The DPC Violation Error on Windows occurs when we are using corrupted and unsupported SSD firmware, infected system files, drivers, or other hardware.
It is related to the Blue Screen of Death or BSOD errors on the computer. It appears while working on Windows 10 or wants to run a particular application on Windows 10. Sometimes, it flashes error code with the issue and also arises when software issues are detected.

How to Fix Search Problems in Windows 10
The search problem in Microsoft Windows 10 is a common problem that lots of users are facing. The search feature on your system may stop responding or may not respond at all. The feature is available on the taskbar, but in some cases when you search for something, it may only show a blank screen. It’s an important feature and without the searching several things becoming tough in operating the Microsoft Windows device. With the search feature, you can access the web pages, find files and software in just one bar. Although, it’s not something that can’t be solved.

How to Customize Search Tool on Windows 10
Windows 10 has various features for its users and one of them is the search feature located at the taskbar. If we talk about the search feature, we can say that Windows 10 provided a dedicated page having multiple search options located inside the Settings application.

BioShock: Guide to Locate the Weapon Upgrade Stations
The BioShock game’s most hardcore players are familiar with the gameplay that it is not like other first-person shooting genres. Using sci-fi, horror and other fascinating elements, users discover the Rapture city of underwater along with its dark history. Unlike conservative veteran, there is an RPG progression system present that will support to enhance your abilities and armaments to better go against challenges.

Windows 10: How to Fix wscadimui.exe?
In the Windows operating system, wscadimui.exe is one of the beneficial and essential Windows components. However, the virus developers have selected such a secure link to modify the game. Due to this, there are a number of users who find it hard and unable to resolve an error caused by it. If you are one of them, then there is no need to fret.
This guide will help to gather enough information to find the reason and solution accordingly. Some of the wscadimui.exe error occurrence reasons are:
- Unfinished Windows 10 files installation utilized for enhancements.
- Corruption tool place in Windows 10 during the downloading files for the latest upgrades.
- Missing or deleted files by a virus.
- Unfinished Windows 10 files uninstallation error occurred.
